The Crucial Importance of Security in the Age of AI

In a world powered by amazing technology, Artificial Intelligence (AI) has become a game-changer. It’s transforming industries and personal experiences alike. But as I dived into the world of AI, I realized something important: before we dive in, we need to understand what AI is all about. This understanding became the key to my journey in recognizing just how crucial it is to grasp AI before diving in. In this article, I’ll share why this knowledge isn’t just handy, but downright essential.

Photo by Ann H on Pexels.com

In an era dominated by rapid technological advancements, Artificial Intelligence has emerged as a transformative force across various industries. From healthcare to finance, and from marketing to autonomous vehicles, AI is reshaping the way we live and work. However, with this surge in AI adoption comes the pressing need to address security concerns. In this article, we’ll delve into why prioritizing security when using AI is paramount for both individuals and organizations.

Protecting Sensitive Data

One of the most critical aspects of AI security is safeguarding sensitive information. AI systems often process vast amounts of data, ranging from personal identification details to confidential business records. A security breach can result in severe consequences, including financial loss, reputational damage, and legal liabilities. Implementing robust security measures is essential to ensure the protection of this valuable data.

Photo by Manuel Geissinger on Pexels.com

Guarding Against Malicious Attacks

As AI systems become more integrated into our daily lives, they also become attractive targets for cybercriminals. Malicious actors may attempt to exploit vulnerabilities in AI models or manipulate them for nefarious purposes. This could lead to outcomes such as misinformation, financial fraud, or even physical harm in cases involving autonomous systems. Security measures like encryption, access controls, and regular vulnerability assessments are crucial in safeguarding against such attacks.

Photo by Tima Miroshnichenko on Pexels.com

Ensuring Ethical Use of AI

Ethical considerations are paramount in the development and deployment of AI. Security measures play a significant role in upholding ethical standards. This includes preventing biased or discriminatory outcomes, ensuring transparency in decision-making, and respecting privacy rights. A secure AI system not only protects against external threats but also ensures that the technology is used responsibly and in accordance with ethical guidelines.

Photo by Andrea Piacquadio on Pexels.com

Mitigating Model Poisoning and Adversarial Attacks

AI models are susceptible to attacks aimed at manipulating their behavior. Model poisoning involves feeding deceptive data to the training process, which can compromise the model’s accuracy and integrity. Adversarial attacks involve subtly modifying input data to mislead the AI system’s output. By implementing security measures such as robust model validation and continuous monitoring, organizations can effectively mitigate these risks.

Photo by Davide Baraldi on Pexels.com

Building Trust and Confidence

Trust is a cornerstone of any successful AI deployment. Users, whether they are consumers or stakeholders within an organization, need to have confidence in the AI system’s reliability and security. Implementing comprehensive security measures not only protects against potential breaches but also fosters trust in the technology, driving greater adoption and acceptance.

Photo by William Fortunato on Pexels.com

Wrap-up

In an increasingly AI-driven world, the importance of security cannot be overstated. Protecting sensitive data, guarding against malicious attacks, ensuring ethical use, mitigating adversarial attacks, and building trust are all vital aspects of AI security. By prioritizing security measures in the development, deployment, and maintenance of AI systems, we can unlock the full potential of this transformative technology while minimizing risks and ensuring a safer, more reliable future. Remember, the benefits of AI can only be fully realized in an environment where security is a top priority.

Apologies, everyone!
I’ve been a bit MIA lately due to a time crunch, but that’s about to change.

Thanks again for returning to my blog!

Building Virtual Machine automated vertical scalability with VMSS in Azure

Are you planning to lift and shift VMs into the Cloud? Or have you done migration and now looking for a way how to scale them automatically?

Well, this article can be right for you!

When it comes to lifting and shifting the application and/or services hosted on the Virtual Machines (VM) from an on-premise environment to the Cloud, building a strategy and design of how to achieve some sort of automatization in VM scaling can be a challenging task.

In general, some type of scalability can be achieved with Virtual Machines as they are but it’s going to be very inopportune.

That’s why it is very important to work on cloud-based infrastructure design prior to the lifting-and-shifting process itself. And remember, VM scaling needs to happen automatically.

The approach I like to teach others is to automate everything that follows repetitive cycles.

But hang on, what if I scale up horizontally in the Cloud by adding extra HW resources (RAM, CPU) to logical machine computing power hosting my VM? .. Yes, this may work but with some scripting to be done first and that is less likely going to be repetitive with the same set of input properties…

But what if full scaling automatization can be accomplished with a higher running cost efficiency and as little configuration work as possible?

Yes, that is all possible these days and I am going to share how to use one of the options from the market.

The options I liked to pursue one project of mine is coming from the Microsoft Azure Resources stash.

Why is that?

It’s not a secret that I’ve worked with Azure since the early saga beginning. Therefore, I have built a long experience with the Azure platform. On the other hand, I have to admit that Azure Software Engineers have done a great job of building platform APIs and Web Wide UX/UI interface (Azure Portal) to make this process seamless and as easy to use as possible. More on my driving decision factors later …

Let’s get started

The Azure resources I have been mentioning here in the prologue are:

VMSS in Azure portal
Azure Compute Galleries in Azure portal
Azure Load Balancers in Azure portal

My reasons for choosing Azure

Every project has different needs and challenges coming from the business domain requirements. More importantly, rational justification on the economical side of the project complexity is mostly the driver of the project’s technological path in the design stage.

For this project, I was lucky because the customer I designed this solution for had part of the business applications and services in Azure already. Also, the customer big ambitious plans to migrate everything else from an on-premise data center to the Cloud in the near time horizon just made my decision more sealed, and therefore Cloud in Azure was the way to go.

Infrastructure diagram

Let’s get a better understanding of the designed system infrastructure from the simplified infrastructure diagram below.

Take it with a grain of salt as the main purpose of it is to highlight the main components used in the project and discuss these in this post.

VMSS simplified infrastructure diagram

What I like most about the selected Azure stack

  • VM redundancy across multiple data centers globally
  • has the ability to multiply VM instances as needed with an option to resize the instance computing power when needed (RAM, CPU, etc. => vertical scaling)
  • high service availability and resilience (subject to infrastructure design – in my case, I provisioned a total of two VMSSs, one geographically different data center each)
  • I like the flexibility of building my rules in VMSS on which the system decides whether VM instances go up or down in the quantity
  • Azure traffic balancer can be linked to VMSS easily
  • the VMSS service can provision up to 600 VM instances (and that is a lot!)
  • the Azure Compute Gallery (ACG) service is able to replicate images globally, supports image versioning and auto-deployment of the latest model to VM running instance (and that was a hot feature for me)

Steps to Provision Services in Azure

In a nutshell, follow these steps to provision Azure services and build the cloud infrastructure from the ground up:

  1. Lift and shift the VM into Azure (I can recommend using the Azure Migrate service to start this process)
  2. Create a new Azure resource: Azure Compute Gallery
  3. Go to the running instance of the VM and capture and generalize the image of the migrated VM
Capturing VM state into the image, Azure portal
Selecting an option to Generalized VM captured state into the image
  1. Create two replicated images (for one datacentre each)
Two replicated images setting
  1. Save the image into Azure Compute Gallery created in step 2
  2. Create two new Azure resources: Virtual Machine Scale Set (in geographically different data centers as per settings in ‘Target regions’ in step 4 for Scaleset redundancy capabilities)
  3. Create scale-out/in rules in VMSS

Scale-out/in VMSS rules example

The screenshot image below shows the example of setting up the Scaling rules for one of the VMSS instances.

VMSS scaling rules example

As you can see in my default profile in the picture above, this VMSS instance is not running any VM instances by default (Minimum = 0). But rather, spins up some (scaling out) based on these criteria:

  1. The main VMSS instance hosted in datacenter A increases on average CPU (or)
  2. The load balancer availability drops below 70% in a given timeframe

Very similar rules are used in the reverse process, aka scaling in.

If you’re planning to use a similar concept in your solution, count a VM operation system booting time in your metrics if high VM-hosted service availability and responsiveness are important to meet.

Microsoft Azure recently introduced a new feature called Predictive autoscale with Pre-launch setup (at the time of writing this article in preview only) which should solve a VM boot time issue for most of the use case scenarios. It works based on cyclical workload patterns determined by machine learning and predicts scaling out needs action in advance.

I like to say, that using Machine learning capabilities in this sort of behavior analysis is a very smart move from Microsoft forward.

I think VMSS has a lot to offer to businesses starting their journey to the Cloud.

The process of setting the infrastructure up is not complicated and can be done over UI/UX design in the Azure portal in no time. The VMSS scaling rules offer a lot of options to choose from and the level of integration with other types of Azure resources is on a very mature level, too.

Thanks for staying, subscribe to my blog and leave me a comment below.

cheers\

Why is CDN very important for your static HTTP content?

Almost everyone heard about CDN but what that actually is?

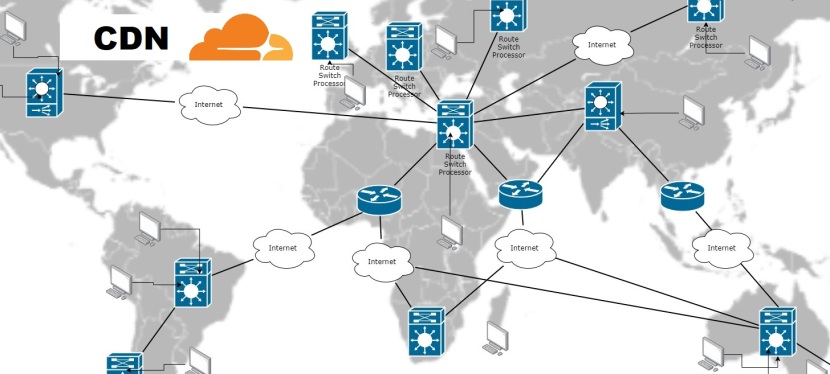
Explained: CDN (Content delivery network) is the set of geographically distributed servers (proxy servers if you like) that cache the static content on running physical hardware which speeds up the actual download to its destination.

The global CDN network
The global CDN network in Example

Now, let me explain why the CDN network is such a big player in the Solution infrastructure and why no Solution developer/architect should overlook this.

But before we go any further let me mention another term which is: response latency.

Explained: In other words, the time needed for to download the Website content entirely to the consumer (End-user) device.

And as you can imagine, this is another very important factor to have your eye on if want to keep your audience engaged to service-provided content as long as possible.

Low latency means a better User responsiveness/experience with the Website (Web service).

The question is, how to achieve the lowest latency possible? … there are two ways how to do it:

  • to use a very fast network for content delivery, or
  • to cache the content as closely as possible geographically to your audience

… the combination of both of these is the ultimate state towards which the global network is going (near real-time response).

And as all of you probably understand by now, to get the best ROI in the time you put into the content it is very important to have your infrastructure in the best shape possible. Keeping your visitors happy by serving them content as fast as possible helps to build better Website awareness and audience growth.

What CDN service provider do I use?

Among all of the CDN providers, I have come across, Cloudflare is the one I was attracted to most.

.. for many reasons:

The main one is that the service is offering reasonably good DDoS protection shielding and well-distributed and fast CDN server nodes.

Cloudflare account dashboard

To me, it is almost unbelievable that all of that for as much as $0! Yes, all of that can be yours for FREE! Very sweet deal, don’t you think? (btw, I am not participating in any affiliate program!)

Setting all of that up is a really straightforward and well-documented process.

If you want to know more visit this guide on how to set it all up.

The entire configuration process becomes even easier if having a domain name address purchased separately from the Web hosting (easier to maintain the DNS servers configuration over the Domain name provider portal – which every solid domain name provider has).

Another feature Cloudflare provides is the fast route finder across the Cloudflare network called Argo, which helps to decrease loading time and reduces bandwidth costs.

I have been using this service for one of my clients who is providing Address lookup and Address validation services over REST API web services hosted in the Cloud in multiple geographically different data centers and I must say that the customer experience has been very positive since.

In numbers, I was able to reduce an HTTP response latency time down from 1.4s to 0.5s! And these are very good performance improvements for a business where time is of the essence.

I am leaving this link here if interested to know more about this.

Anyway, thank you again for visiting this post, I hope you have enjoyed reading and let me know what CDN provider you’re using!

cheers\

Skills needed for becoming an ultimate Frontend Software Developer

If seriously thinking about starting your career as a Frontend Software developer, you’re not going to do a bad turn with any of these Technical skills on the list below.

Especially for those who want to be demographically independent – aka, you’ll be able to find a job anywhere you go to maintain your cash flow…

From my working experience, these are the most resonating ones currently on the market (2021) in sequential order from the most wanted to down:

Bonus skills:

There are plenty of training materials online to start your journey.

But … I strongly recommend starting with the basics and principles first before jumping on core development. This can save you a lot of time in faulty code investigation and prevent unnecessary initial frustration (learning curve).

Btw., I am more like a person who learns from visual sources and I can give you a few tips on what I use for your start:

  1. Youtube.com
  2. Technology homepage and community forums (for example homepage for Node.js, and community forum dev.to)
  3. docs.microsoft.com/
  4. channel9.msdn.com/

I hope you enjoy this reading today.

Thanks for staying, subscribe to my blog, and leave me a comment below.

cheers\

5 software development skills to learn for rapid development

The world is changing and technology is with it.

Mainly because software product deployments are becoming more frequent and Software houses and Service-oriented companies are pushing hard on the T2M (Time to Market) selling factor to keep them visible on the market.

Although all upcoming projects are prerequisites of non-functional requirements still the same (mainly),

  • the infrastructure design leveraging from Service Oriented Architecture
  • the solution must be scalable and automated to provision
  • the solution is capable of being hosted in the Cloud as well as on a hybrid network infrastructure
  • the solution is ISO 9126-compliant
  • first release completion time of 6 months

, amount of functional requirements needed for the first release keeps growing and in most cases does not help to achieve delivery in a given time.

And that is pretty bad.

Therefore “smart” selection of the frameworks and tools to use for building whatever investor wants to build a solution is an absolute must.

Photo by fauxels on Pexels.com

But, you won’t be able to succeed without the technical knowledge and experience of the production team! (the place where things are getting serious)

To get familiar with what skill sets to seek out while building a team capable of producing business value early from the beginning of project initiation, I have created a list of the suggested frameworks and platforms to use.

Hope it helps you to battle this constant competition market and investor pressure and elevate the progress in the initial phase of solution development as much as possible.

  1. Outsystems PaaS

    You are maybe already familiar with the term “low code”. The word on which many conceptual developers are rolling their eyes up. But hold on – if all that investors want is to get the product out of the door as soon as possible and for the cost related to head x time spent on the project (which would probably be somewhere around 50% less as opposed to the traditional way of coding in this case), just give it to them!

    Every solid developer must be familiar with this PaaS these days if not with Outsystems then with some other alternative such as PowerApps, for example.

  2. LoopBack

    Heyou – all Node.js Devs are lifting their eyebrow. Yes, very powerful framework, indeed. Usage of LoopBack CLI cannot be easier thanks to documentation built by many contributors from this OpenSource project.

    Simply put, this framework allows you to build your complete backend infrastructure with speed which elevates your project progress exponentially. You can choose from REST, SOAP, GraphQL, and RPC servers/services and manage all of these nodes with PM2 process management systems.

  3. Mocha

    Don’t forget about a testing framework. This option will work well with the ones mentioned above and you cannot go wrong with learning this framework right away. Javascript is rocking all over the globe right now and would be silly not to pay any attention to this programming language intentionally.

    And so why not leverage the JavaScript syntax in every SDLC phase? Sounds logical, hm?

  4. AplifyCLI

    This CLI utility from AWS is becoming more and more popular among developers from generation Y. Nobody likes to deal with building the infrastructure on the DevOps level unless it’s ABSOLUTELY necessary. And to be fair a lot of the service provisioning commands can be easily automated.

    Therefore, a utility that scaffolds everything you need for hosting your system is a necessary skill these days.

  5. Terraform

    If not going to use any of these “low code” platforms mentioned above for building your solution, a solid provisioning automation system (“engine”) and paradigm for not only infrastructure automation provisioning but also for keeping track of infrastructure changes in source code is the must. You cannot go wrong with Azure DevOps/ARM Templates or Terraform. Both offer you a lot of capabilities and automation to follow the IoC (Infrastructure as a code) paradigm.

    To me, Terraform is a better option for those thinking of incorporating platforms of different technologies into the solution.

PS: The technology cannot set the project for success if architecture, design, and test automation are compromised. Not having the right team, implemented processes, following the best practices, and a need to keep good progress momentum on the project, your entire ship can turn in the opposite direction and end up with catastrophic failure.

This is all for today, hope you enjoyed this reading today, and leave me your thoughts down below in the comments!

Thanks for staying, subscribe to my blog and leave me a comment below.

cheers\

Distributed System Architecture: Modern Three-Tier

Modern Three-Tier

The most used infrastructure architecture for SMEs and data-oriented small businesses operating on a global scale.

When it comes to the technology stack, and if talking about Web Applications then the most common setup I have seen all over the place is React.js being used for SPA or PWA frontend as a client/presentation layer, node.js as a Rest API Server/business layer and Cassandra (open source) as distributed (optionally cloud-based), fault-tolerant, well-performed, durable, elastic, …, supported (don’t forget on decent support from the community!), decentralized and scalable database/persistent layer.

Your database does not have to tick all of these boxes from above (apart from being distributed), but if you’re going to put all that effort into building this type of infrastructure, you want to make sure that the database meets as many required features from being modern and long-lasting solution sitting in infrastructure as possible (think about your development ROI Devs!!).

The way it works is that the client application (fetched from the store or application server) is capable of handling the user tasks by itself on the client device with the data supported over the API (node.js) and in the event of Server API running out of the breath, a new instance of the Application API server will be provisioned (new node is getting created, horizontal scaling -> scaling out/in).

Database, as it stands in this model, does not have this scaling capability but can scale up or down instead as needed (service is given more system resources, vertical scaling -> scaling up/down).

An illustration of how it’s getting all wired up together

1.1 Modern 3-Tier Distributed System Architecture

Summary

Pros

  • great logical separation and isolation with a lot of room for cybersecurity policy integration
  • not-complex architecture when it comes to problem investigation and troubleshooting
  • easy to medium complexity to get the infrastructure up and ready for development and maintenance (less DevOps, yay!)
  • an easy option to replicate infrastructure on user localhost for development purposes (just makes it all easier during branch development)
  • infrastructure running cost is relatively small

Cons

  • decommissioning provisioned nodes can be tricky (depending on the technology used)
  • data synchronization and access need orchestration (subjected to database type)
  • shipping new features out needs an entire Application server deployment (downtime)

Thanks for staying, subscribe to my blog and leave me a comment below.

cheers\

Software development principles and practices for solid Software Engineers

Although today’s way of software development is rapidly changing, having a good understanding of these principles and good practices may only help you become better in software development.

Personally, I would recommend to every solid Software Engineer to get familiar with these practices if not already.

Coding practices

Photo by RDNE Stock project on Pexels.com

YAGNI

This principle came from Extreme Programming and states very simple things: Don’t overthink the problem solution in the execution stage.

Just write enough code to make things work!

DRY

This principle follows and states for: “Every piece of knowledge must have a single, unambiguous, authoritative representation within a system.”

Basically, don’t replicate functionality in the system, and make your code reusable.

SOLID

This principle has its own space in OOP. The SOLID mnemonic acronym represents these five design principles:

  1. Single-responsibility
    Design your classes in structural business entity/domain hierarchy, so that only one class encapsulates only logic related to it.
  2. Open-closed
    Entities should be open for extension but closed for modification.
    In the development world, any class/API with publicly exposed methods or properties should not be modified in their current state but extended by other features as needed.
  3. Liskov substitution
    This principle defines the way how to design classes when it comes to inheritance in OOP.
    The simplified base definition says that if class B is a subtype of class (super) A, then objects of A may be replaced with objects of type B without altering any of the desirable properties of the program.
    In other words, if you have a (super) class of type Vehicle and subclass of type Car, you should be able to replace any objects of Vehicle with the objects Car in your application, without breaking application behavior or its runtime.
  4. Interface segregation
    In OOP is recommended to use Interfaces as an abstracted segregation level between the producer/consumer modules. This creates an ideal barrier preventing coupling dependencies and exposing just enough functionality to the consumer as needed.
  5. Dependency inversion
    The principle describes a need for abstract layer incorporation between the modules from top to bottom hierarchy. In brief, a high module should depend on an abstract layer (interface), and a lower module with dependency on the abstract layer should inherit/implement it.

KISS

Acronym for Keep it simple, stupid – and my favorite over the last years!

The principle has a very long history but has been forgotten by many Devs many times from my professional experience.

Avoiding unnecessary complexity should be in every solid Software Engineer’s DNA.

This keeps the additional development cost down for further software maintenance, new human resources onboarding, and the application/system’s additional organic growth.

BDD

Behavior-driven development is becoming a more and more desirable practice to follow in Agile-oriented business environments.

The core of these principles is coming from FDD. The BDD applies a similar process at the level of features (usually a set of features). One’s tests build the application/system is getting a return on investment in the form of automated QA testing for its lifetime. And therefore this way of working is very economically efficient in my opinion.

The fundamental idea of this is to engage QAs (BAs) in the development process right from the beginning.

This is a great presentation of the principle from the beginning to the end of the release lifecycle: Youtube

TDD

The software development process gained its popularity over time in test automatization. Basics come from the concept of starting the test first and following with the code until the test runs successfully.

Leveraging Unit test frameworks for this such as xUnit, NUnit (or similar), if you are a .NET developer, helps to build a code coverage report very easily in MS Visual Studio (Enterprise edition) for example, which helps to build QA confidence over the code which last long time over the code releases.

FDD

Well, know approach how to deliver the small blocks (features) in an Agile running environment.

In other words, if you have a load of work to deliver is better to slice it down to individual blocks (features) that can be developed, tested, and delivered independently.

The whole FDD methodology has 5 stages:

  1. Develop a model of what is needed to build
  2. Slice this model into small, testable blocks (features)
  3. Plan by feature (development plan – who is going to take that ownership)
  4. Design by feature (selects the set of features the team can deliver within the given time frame)
  5. Build by feature (build, test, commit to the main branch, deploy)

The beauty of this development methodology approach is that deployment features such as Feature toggling can be integrated with relatively minimal complexity overhead. With this integration in place, the production team can move forward only on one main branch, an unfinished feature development state regardless. An enterprise-level production team will appreciate this advantage, no doubt about it.

Summary

By following these principles and practices production team will produce maintainable code, with high test coverage and human resources high utilization over the SDLC (ROI).

Thanks for staying, subscribe to my blog and leave me a comment below.

cheers\

TLS handshake between Client and Server explained

Not every developer these days has a clear picture of how the Client/Server HTTPS/TSL encryption works. To be fair I have to sometimes look at my notes to recall this process as it’s confusing and easy to forget.

Especially for these Devs working on the front end and using publicly available 3rd parties middleware, ready to be used for your solution – so, why bother?

But anyway … this is a good piece of information to keep in the mind and if you forget, this handy post can remind you how the entire process workflow works again.

TLS handshake (negotiation) process flow

Example algorithm used now on: ECDH/RSA

  1. Client – [Sends](Hello: These are my supported cipher suites) -> Server
  2. [Server chooses the cipher from the supplied cipher suites]
  3. Server – [Sends](Hello: This is my certificate with Public key) -> Client
  4. [Client validates the Certificate]
  5. Server – [Sends](Hello done) -> Client
  6. [Client generates Pre-Master secret and encrypts it by Server Public key]
  7. [Client generates (calculate) Symmetric key (Master secret) based on Pre-Master secret and random numbers
  8. Client – [Sends: Pre-Master Secret exchange](Change Cipher: Pre-Master secret) -> Server
  9. [Server receives and decrypts Pre-Master secret]
  10. [Server generates (calculate) Symmetric key (Master secret) based on received Pre-Master secret and random numbers]
  11. Client – [Sends](Change Cipher Spec) -> Server, which means that from now on, any other message from the Client will be encrypted by the Master secret
  12. Client – [Sends: Encrypted] -> Server and the Server tries to decrypt the finished message
  13. Server – [Sends](Change Cipher Spec) -> Client, which means that from now on, any other message from the server will be encrypted by the Master secret
  14. Server – [Sends: Encrypted] -> Client, Client tries to decrypt the message

-- handshake is completed --
— the communication encryption is changing from asymmetric to symmetric —

Example algorithm used now on: AES

15. Symmetric bulk encryption switched, Client and Server established TLS communication

// Agenda

   [] -> action
   () -> message

Some other facts to be aware of

  • Anything encrypted by the public key can be decrypted by the private key only
  • More details about TSL
  • What are ECDH, RSA, and AES
  • What are asymmetric and symmetric cryptography

Thanks for staying, subscribe to my blog, and leave me a comment below.

cheers\

Immutable data types after .NET 5 release

Just a couple of weeks ago, Microsoft released RC of .NET 5 which is (unfortunately) not going to be an LTS (Long Term Support) release but on the other hand, it’s coming with some great features in it (yep).

One of them comes as a part of the new release of C# 9.0 (part of the .NET 5 release) which is Immutable Objects and Properties (records and init-only properties). Quite a smart concept in my opinion …

Recap on immutable data type

The immutable data type is basically the data type of the variable of which the value cannot be changed after creation.

How does it look in reality?

Well, once immutable data typed object is created the only way how to change its value is to create a new one with a copied value of the previous instance.

What are the current immutable (and mostly used) data types from .NET CLR?

Primitive types

  • Byte and SByte
  • Int16 and UInt16
  • Int32 and UInt32
  • Int64 and UInt64
  • IntPtr
  • Single
  • Double
  • Decimal

Others

  • All enumeration types (enum, Enum)
  • All delegate types
  • DateTime, TimeSpan and DateTimeOffset
  • DBNull
  • Guid
  • Nullable
  • String
  • Tuple<T>
  • Uri
  • Version
  • Void
  • Lookup<TKey, TElement>

As you can see, we have quite a few to choose from already. How this list is going to look like after .NET 5 full release in November 2020?

Well, it’s going to be a revolutionary change in my 2 cents.

Principally, any object using .NET 5 runtime (and C# 9.0) can be immutable and also implement its own immutable state – and that is a HOT feature.

The syntax of the immutable properties looks like this in this example:

public class ObjectName
{
    public string FirstProperty { get; init; }
    public string SecondProperty { get; init; }
}

On the other hand, the syntax of the immutable object (called a record) looks like this:

public record class ObjectName
{
    public string FirstProperty { get; init; }
    public string SecondProperty { get; init; }
}

As you can see, the syntax is very clear and intuitive to use.

More details about new C# 9.0 features can be found here https://docs.microsoft.com/en-us/dotnet/csharp/whats-new/csharp-9#record-types.

Thanks for staying, subscribe to my blog, and leave me a comment below.

cheers\

How to build and provision Azure Cognitive Search service in 20 minutes

This Azure service has been here for a while now, but lately got a few improvements that make the integration and use of it even easier and more seamless than before.

Just before going any further, if you haven’t read anything about it, I recommend you to start with this article first https://docs.microsoft.com/en-us/azure/search/search-what-is-azure-search as I am not going to dive too much into the details today. This reading is going to be about my personal experience of getting a Cognitive Search service provisioned with a bunch of data (of one source) connected to it.

Personally, I like to look at the problems to solve with my business lens. What that means is focusing on building content (business value) rather than building the search engine (feature). I am not saying that compromising (non-business related) system features that are helping users to enhance their User system Experience is a good thing to do. All I am saying is stop re-inventing the wheel!

Hey Devs, don’t give me this wiggle face saying things like: “c’mon, it’s not that hard to do it by yourself!”. Yes, but actually it is hard from the time complexity point of view … To build a great search engine with features your audience is going to like would take many weeks of man/hours to do so. These features include Auto-completion, geospatial search, filtering, and faceting capabilities for a rich UX, OCR (ideally backed by AI), key phrase extraction, image text found results highlighting, and all of that with the ability to scale this service as needed and add as many multiple (and different) data sources as needed.

Can you see my point, now? Did one of your eyebrows just lift up? :)) Anyway .. let’s jump into it and see how long this is going to take me to build in the Azure portal.

Steps how to build a first Cognitive Search as a Service

1) Go to the Azure portal, search for Cognitive Services and add a new one called “Azure Cognitive Search

Adding Azure Cognitive Search to the Cognitive Service library in the Azure portal

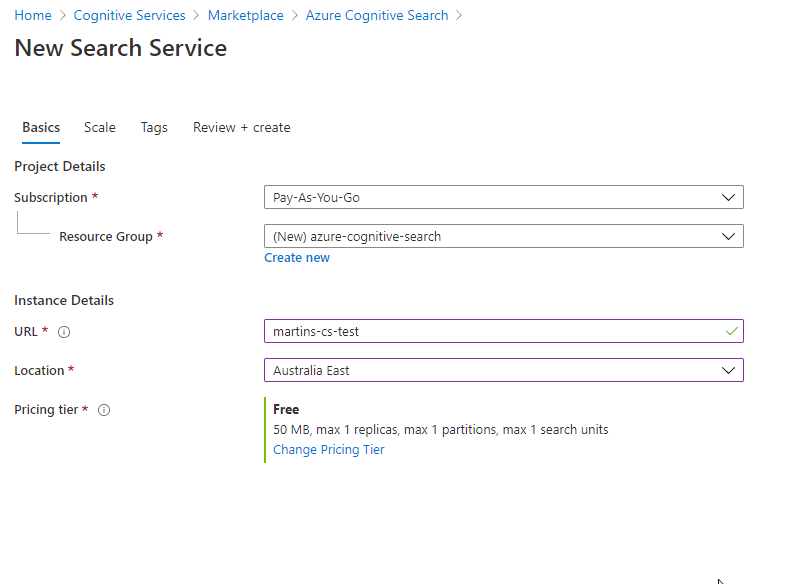
2) As for all services in Azure space, you need to fill up what Subscription and Resource Group this service will belong to. And as the next step, preferred URL, Geographic location of the data center, and pricing Tier. I am choosing the free Tier (which should be enough for this exercise) and the location close to NZ. The next step is to click on Validate, and on Create button afterward.

Filling up the service initials

3) The first step in the wizard is the “Connect to your data” tab. That means that on this page you can connect to multiple data sources. As you can see from the picture below, quite a few options are available to choose from (and most likely going to cover all of the use case scenarios). For this exercise, I am going to take “Samples” and SQL database. You can add as many data sources as you want (with the respect to limitations of the selected service Tier type).

Adding a connection to the data source

4) At the “Add cognitive skills” tab I decided to add a bunch of additional Text Cognitive Skills, even though this step is optional. My reasons are purely investigative and I would like to see how the @search.score field in returning data result sets is going to look like when trying to search my documents by any of these fields from the Enriched data set.

Adding extra source fields for cognitive skills run

5) In the next step “Customize target index” (sometimes referred to as a “pull model“) I am going to leave all pre-populated settings as they are as I am happy with it for now. In this step, you can configure things like the level of data exposure, data field types, filtering, sorting, etc.

Just to give you a better understanding of what the search index is in this context – think about it as in a relational database a search index equates to a table. And also we have documents, which are the items of the index. Think about them as documents that are roughly equivalent to rows in a table.

Also, remember to keep a Key field in Edm.String data type. This is a mandatory prerequisite.

Customizing the target indexes

6) In the “Create an Indexer” tab (the way how to index data in a scheduled manner) I am not allowed to configure how often should be mapping table (index) build. The reason for it is that the Sample SQL database I am using in this exercise does not use any Change tracking policies (for example  SQL Integrated Change Tracking Policy). Why is needed? Well, basically Cognitive search needs to know when the data delete change happened to address that. You can read more about it here.

For now, I am going to submit this form and move on.

The service starts provisioning itself (this should not take long to finish) and after a couple of minutes, I should have everything ready for testing.

Create an indexer tab

Testing the Search Service

Now, let’s have a look at “Search explorer” from the service level main top menu and craft some data queries. My first query was the “Bachelor-Wohnung” word, which nicely got populated into the URL query as the value of &search element by itself…

Data result set from an example query

From now on it is all about knowing how to use a query syntax (and you can really go hard on this). For more search query examples visit this MS documentation https://docs.microsoft.com/en-us/azure/search/search-explorer?WT.mc_id=Portal-Microsoft_Azure_Search

I have to say that building this service did take me about 20 minutes (for someone who has some experience already) from having nothing to an easy-to-configure and scale search engine. Anyone should be able to build the first Cognitive search service by a similar time after reading this post now.

If there are any questions or want to know more about this service, visit this site built by Microsoft at https://docs.microsoft.com/en-us/azure/search/. These people did a really great job in documenting all of it. This material should help you to elevate your skills to a more advanced level.

What is the Azure Cognitive Search Tiers pricing

_FREEBASICSTANDARD S1STANDARD S2STANDARD S3STORAGE OPTIMIZED L1STORAGE OPTIMIZED L2
Storage50 MB2 GB25 GB
(max 300 GB per service)
100 GB
(max 1 TB per service)
200 GB
(max 2 TB per service)
1 TB
(max 12 TB per service)
2 TB
(max 24 TB per service)
Max indexes per service31550200200 or 1000/partition in high density1 mode1010
Scale out limitsN/AUp to 3 units per service
(max 1 partition; max 3 replicas)
Up to 36 units per service
(max 12 partition; max 12 replicas)
Up to 36 units per service
(max 12 partition; max 12 replicas)
Up to 36 units per service
(max 12 partition; max 12 replicas)
up to 12 replicas in high density1 mode
Up to 36 units per service
(max 12 partition; max 12 replicas)
Up to 36 units per service
(max 12 partition; max 12 replicas)
up to 12 replicas in high density1 mode
Document Cracking: Image ExtractionN/A
(only 20 documents supported)
(price per 1,000 images)
0-1M images – $1.512
1M-5M images – $1.210
5M+ images – $0.983
(price per 1,000 images)
0-1M images – $1.512
1M-5M images – $1.210
5M+ images – $0.983
(price per 1,000 images)
0-1M images – $1.512
1M-5M images – $1.210
5M+ images – $0.983
(price per 1,000 images)
0-1M images – $1.512
1M-5M images – $1.210
5M+ images – $0.983
(price per 1,000 images)
0-1M images – $1.512
1M-5M images – $1.210
5M+ images – $0.983
(price per 1,000 images)
0-1M images – $1.512
1M-5M images – $1.210
5M+ images – $0.983
Private Endpoints Related ChargesN/AAdditional charges may apply2Additional charges may apply2Additional charges may apply2Additional charges may apply2Additional charges may apply2Additional charges may apply2
Price per unitFree$0.153/hour$0.509/hour$2.033/hour$4.065/hour$5.805/hourN/A
Azure Cognitive Search Tiers pricing

Overall Azure service rating

  • it is very easy to create your own search SaaS in a couple of minutes
  • the intuitive way how to integrate new data sources into the service
  • easy to leverage cognitive capabilities in features like OCR
  • CONVENIENCE – zero coding is required on the service side, all search service settings can be configured in the Azure portal

Thanks for staying, subscribe to my blog, and leave me a comment below.

cheers\