Building Virtual Machine automated vertical scalability with VMSS in Azure

Are you planning to lift and shift VMs into the Cloud? Or have you done migration and now looking for a way how to scale them automatically?

Well, this article can be right for you!

When it comes to lifting and shifting the application and/or services hosted on the Virtual Machines (VM) from an on-premise environment to the Cloud, building a strategy and design of how to achieve some sort of automatization in VM scaling can be a challenging task.

In general, some type of scalability can be achieved with Virtual Machines as they are but it’s going to be very inopportune.

That’s why it is very important to work on cloud-based infrastructure design prior to the lifting-and-shifting process itself. And remember, VM scaling needs to happen automatically.

The approach I like to teach others is to automate everything that follows repetitive cycles.

But hang on, what if I scale up horizontally in the Cloud by adding extra HW resources (RAM, CPU) to logical machine computing power hosting my VM? .. Yes, this may work but with some scripting to be done first and that is less likely going to be repetitive with the same set of input properties…

But what if full scaling automatization can be accomplished with a higher running cost efficiency and as little configuration work as possible?

Yes, that is all possible these days and I am going to share how to use one of the options from the market.

The options I liked to pursue one project of mine is coming from the Microsoft Azure Resources stash.

Why is that?

It’s not a secret that I’ve worked with Azure since the early saga beginning. Therefore, I have built a long experience with the Azure platform. On the other hand, I have to admit that Azure Software Engineers have done a great job of building platform APIs and Web Wide UX/UI interface (Azure Portal) to make this process seamless and as easy to use as possible. More on my driving decision factors later …

Let’s get started

The Azure resources I have been mentioning here in the prologue are:

VMSS in Azure portal
Azure Compute Galleries in Azure portal
Azure Load Balancers in Azure portal

My reasons for choosing Azure

Every project has different needs and challenges coming from the business domain requirements. More importantly, rational justification on the economical side of the project complexity is mostly the driver of the project’s technological path in the design stage.

For this project, I was lucky because the customer I designed this solution for had part of the business applications and services in Azure already. Also, the customer big ambitious plans to migrate everything else from an on-premise data center to the Cloud in the near time horizon just made my decision more sealed, and therefore Cloud in Azure was the way to go.

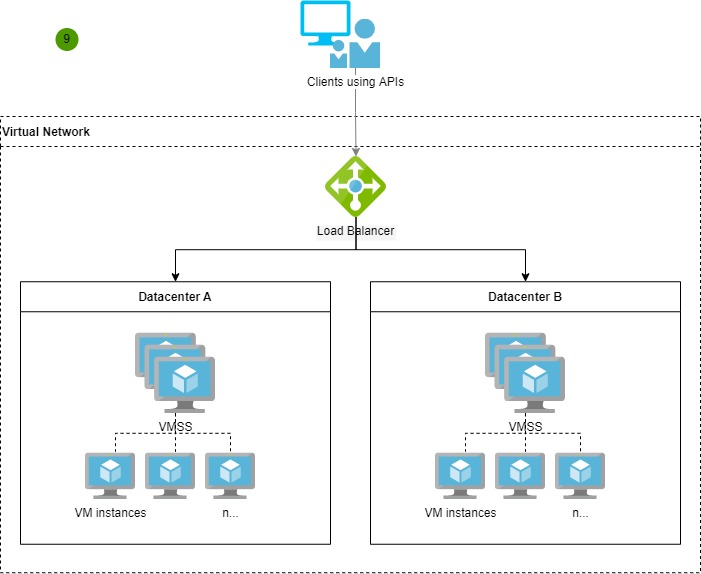
Infrastructure diagram

Let’s get a better understanding of the designed system infrastructure from the simplified infrastructure diagram below.

Take it with a grain of salt as the main purpose of it is to highlight the main components used in the project and discuss these in this post.

VMSS simplified infrastructure diagram

What I like most about the selected Azure stack

  • VM redundancy across multiple data centers globally
  • has the ability to multiply VM instances as needed with an option to resize the instance computing power when needed (RAM, CPU, etc. => vertical scaling)
  • high service availability and resilience (subject to infrastructure design – in my case, I provisioned a total of two VMSSs, one geographically different data center each)
  • I like the flexibility of building my rules in VMSS on which the system decides whether VM instances go up or down in the quantity
  • Azure traffic balancer can be linked to VMSS easily
  • the VMSS service can provision up to 600 VM instances (and that is a lot!)
  • the Azure Compute Gallery (ACG) service is able to replicate images globally, supports image versioning and auto-deployment of the latest model to VM running instance (and that was a hot feature for me)

Steps to Provision Services in Azure

In a nutshell, follow these steps to provision Azure services and build the cloud infrastructure from the ground up:

  1. Lift and shift the VM into Azure (I can recommend using the Azure Migrate service to start this process)
  2. Create a new Azure resource: Azure Compute Gallery
  3. Go to the running instance of the VM and capture and generalize the image of the migrated VM
Capturing VM state into the image, Azure portal
Selecting an option to Generalized VM captured state into the image
  1. Create two replicated images (for one datacentre each)
Two replicated images setting
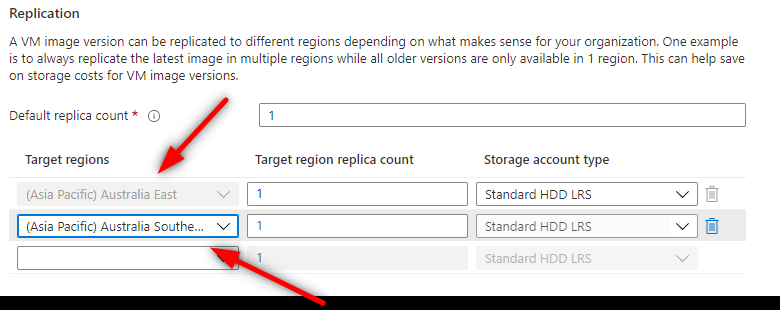
  1. Save the image into Azure Compute Gallery created in step 2
  2. Create two new Azure resources: Virtual Machine Scale Set (in geographically different data centers as per settings in ‘Target regions’ in step 4 for Scaleset redundancy capabilities)
  3. Create scale-out/in rules in VMSS

Scale-out/in VMSS rules example

The screenshot image below shows the example of setting up the Scaling rules for one of the VMSS instances.

VMSS scaling rules example

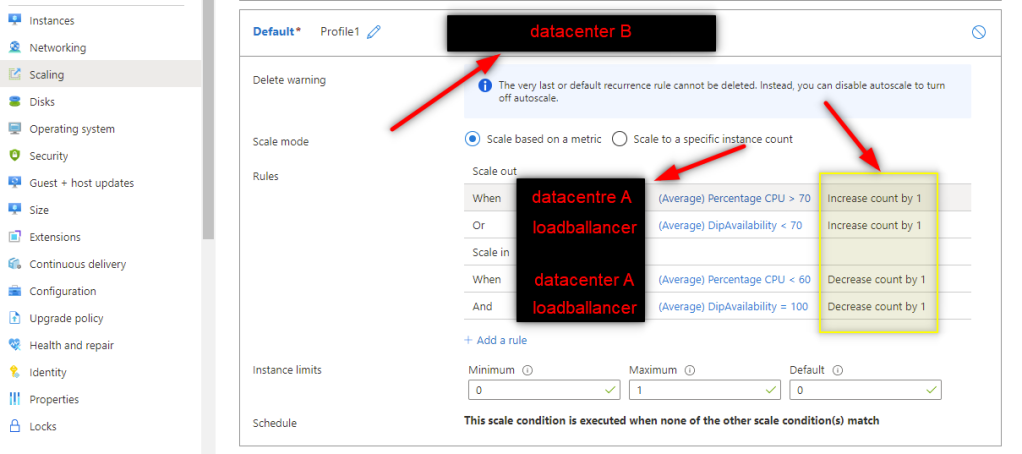
As you can see in my default profile in the picture above, this VMSS instance is not running any VM instances by default (Minimum = 0). But rather, spins up some (scaling out) based on these criteria:

  1. The main VMSS instance hosted in datacenter A increases on average CPU (or)
  2. The load balancer availability drops below 70% in a given timeframe

Very similar rules are used in the reverse process, aka scaling in.

If you’re planning to use a similar concept in your solution, count a VM operation system booting time in your metrics if high VM-hosted service availability and responsiveness are important to meet.

Microsoft Azure recently introduced a new feature called Predictive autoscale with Pre-launch setup (at the time of writing this article in preview only) which should solve a VM boot time issue for most of the use case scenarios. It works based on cyclical workload patterns determined by machine learning and predicts scaling out needs action in advance.

I like to say, that using Machine learning capabilities in this sort of behavior analysis is a very smart move from Microsoft forward.

I think VMSS has a lot to offer to businesses starting their journey to the Cloud.

The process of setting the infrastructure up is not complicated and can be done over UI/UX design in the Azure portal in no time. The VMSS scaling rules offer a lot of options to choose from and the level of integration with other types of Azure resources is on a very mature level, too.

Thanks for staying, subscribe to my blog and leave me a comment below.

cheers\

How to save over 50% on Azure resources running cost

The running cost on some of the Azure resources (and licenses) can be massive and can cause a lot of frustration to a new starting business.

Therefore, I do always talk to my clients and try to find the best solution fitting their current needs. Then following the strategy of organic growth is the best way how to keep costs down while following the business transformation with technology into the mature and profitable one in the future.

In this article, I am going to explain how to cut Azure resource costs down from 50 – 70% depending on the resource type and length of commitment.

Where to start?

Azure has a very smart way of how to keep the customer’s engagement for years. I admire this strategy because creates a really good value for both parties (customer and provider).

If you haven’t heard about Azure Reservations it’s a good time to start your home research with this link.

In nutshell, you pay less for the Azure resource based on pre-purchased Reservations in years. That means that a longer commitment with the resource you make is less expensive it is going to get.

How to order Reservation in the Azure portal

1. Log in to the Azure portal and search for ‘Reservations’. Select the Reservations option from the list and you should be able to see this page like in the picture below:

This is the current list of all reservations I have for one of my clients

2. Click on the ‘plus’ icon in the top left corner. You will be redirected to this page as shown in the picture below:

List of resources to choose from

3. Select a resource you like to reserve from the list (I chose Virtual Machine)

4. If you currently hosting some VM (as in my case) in Azure without Reservation, this tool does the filtering of the size of the VM automatically on the next page for you based on real-time utilization of that VM – that is smart!

5. Refine your selection in the next window by selecting the exact instance you like to reserve like in the picture below. This step is brilliant. It gives you an exact quote of how much it is going to cost you and what savings you are getting with a selected time commitment!

Available VM sizes with a price quote and estimate saving

6. Review the order and click ‘Review + Buy’ as is shown in the picture below:

Review order and purchase the reservation

7. … and we are done! You can monitor the overall Reservation utilization on the resource on the same page later on.

The process flow thanks to MS UX and UI is very intuitive, fast, and clear. Tell me your thoughts in the comments below!

Changing mind after purchase?

Unfortunately, there is some cost associated if want to cancel after purchasing the Reservation.

But, what I would recommend doing instead is trying to do a Reservation exchange!

Yep, you hear me right, you can exchange the Reservation for some other one as long as the purchasing price is not lower than the original one.

I think it’s brilliant and saves a lot of fiddling around on cost management when business strategy changes!

Thanks for staying, subscribe to my blog, and leave me a comment below.

cheers\


How to provision Azure Function in Azure by using Terraform CLI

Choosing the right way how to keep an infrastructure versioned and well maintained in source code is becoming a quite big issue these days.

There are several options to choose from on the market currently, and it’s easy to get trapped in a never-ending research cycle.

For those working with Azure services only, ARM Templates are more than an obvious answer to this but what if want to have more flexibility in going beyond the Azure boundaries?

You may be wondering why I should use anything else but ARM templates?

The answer is simple.

The ARM templates may be a bottleneck for the IT solutions using different cloud providers (multi-cloud solutions). In this case, managing infrastructure as a code may become a quite tricky (and ugly) thing to do overtime. The thing is that every tool used for infrastructure management has its “own ways” of how to work with it and that comes with the necessary knowledge base every production team must have beforehand.

And as an implication of this, choosing the right tool for your infrastructure management (including deployment) is very important.

Terraform would be a great way how to face this challenge. Just as the proof of its simplicity, what I would like to show you here is a short demonstration of how easy it is to provision Azure function in the Azure cloud by using the HashiCorp Configuration Language (HCL) and TF (Terraform) CLI utility in PowerShell.

You might be wondering, what features does TF has over the ARM templates?

Well, these infrastructure management tools have “the same” set of functionality but TF has other perks on top of that, which makes it a more secure and convenient tool for DevOps (besides multicolored cloud support).

Key features are:

  1. HCL (HashiCorp Configuration Language) – high-level configuration syntax, well structured and intuitive language (TF also supports configuration using JSON for these JS geeks)
  2. Execution Plans – shows you exactly what is going to happen with infrastructure before the change is getting executed
  3. Resource Graph – the visual understanding of the infrastructure, and in my opinion, Terrafarom has done a very good job on this feature (don’t forget that it’s OpenSource!)
  4. Change Automation – yes, every change needed on infrastructure can be automated -> which means less human interaction -> and less room for human errors, YAY!

If you’re new to Terraform and want to get a feel of what Terraform is, have a look at this introduction video footage with the Co-Founder and CTO Armon Dadgar.

Prerequisites (before we start)

  • Terraform utility downloaded and configured on the local environment (guide of how to do it … here)
    for Win10 users, in case of having an issue with WSL2, I recommend following this article to get over this issue
  • Azure CLI is installed and ready to roll (guide on how to do it … here)

Steps to follow

For these going exactly step by step as described in this guide make sure that any resource name starting with ‘ms‘ needs to be unique.

I recommend using some other characters as prefixes just to be sure that this exercise on your side will go smoothly. You won’t go far with the copy&paste technique here – oops!

  1. Log in to Azure by using Azure CLI (Azure Command Prompt) or PowerShell
az login

2. If you have multiple subscriptions, skip this step otherwise. List them all out by running this command and choose the one wanted to be used (subscription_id )

az account list
Subscription details after login

3. Find out what is the latest supported AzureRM provider here (at this time of writing this post 2.29.0). This step is not mandatory but I would highly recommend doing it this way as AzureRM API might change in the future so better to have a version of the CLI referenced to the code batch file.

4. Create a folder and the file within main.tf (mine is located at c:/Temp/terraform-test/)

5. Add this snipped code at the beginning of the file. This will configure Azure CLI authentication in Terraform

provider "azurerm" {
  version = "=2.29.0"
  subscription_id = "<your Azure subscription id from the step 1 or 2>"
  features {}
}

6. Append the file with the rest of the script from below.

For this exercise, the data center in Australia Central is going to be used (but change it if you like), new Azure function is going to be using the consumption service plan as well as running on Windows OS (this is the default option anyway – change it to the Linux if you wish)

resource "azurerm_resource_group" "example" {
  name     = "azure-functions-cptest-rg"
  location = "australiacentral"
}

resource "azurerm_storage_account" "example" {
  name                     = "msfunctionsapptestsa"
  resource_group_name      = azurerm_resource_group.example.name
  location                 = azurerm_resource_group.example.location
  account_tier             = "Standard"
  account_replication_type = "LRS"
}

resource "azurerm_app_service_plan" "example" {
  name                = "azure-functions-test-service-plan"
  location            = azurerm_resource_group.example.location
  resource_group_name = azurerm_resource_group.example.name
  kind                = "FunctionApp"

  sku {
    tier = "Dynamic"
    size = "Y1"
  }
}

resource "azurerm_function_app" "example" {
  name                       = "mstest-azure-functions"
  location                   = azurerm_resource_group.example.location
  resource_group_name        = azurerm_resource_group.example.name
  app_service_plan_id        = azurerm_app_service_plan.example.id
  storage_account_name       = azurerm_storage_account.example.name
  storage_account_access_key = azurerm_storage_account.example.primary_access_key
}

7. Navigate to the folder with main.tf file created, open Command prompt or PowerShell, and type this command below

terraform init

This action will the create selections.json file at .terraform\plugins\ and download the AzureRMplugin into the .terraform\plugins\registry.terraform.io\hashicorp\azurerm\2.29.0\windows_amd64 directory.

The CLI utility starts its live time with the batch files from now on – a perfect isolation approach from the running environment (although the CLI utility itself may be quite hungry for disk space!).

The selections.json file content

8. You can skip this step if in hurry but continue reading if you want to know more about how to generate the infrastructure change plan …

Open the Command prompt or PowerShell and run this command from below to see the infrastructure plan before the change execution.

I can strongly recommend using some advanced IDE like MS Code for working with TF (because the text editor and the command console are all integrated into one app) as opposed to switching from the text editor back to the command console – this can be annoying…

terraform plan

The plan should look similar to the screenshot below. For those using MS Code, I would recommend downloading the HashiCorp Terraform extension to accelerate your further IaC development – I found it very useful in time efficiency!

Terraform infrastructure change plan

9. Let’s get ready for D-day. Type this command to apply and execute the changes to Azure

terraform apply

This command is going to generate the infrastructure change plan and prompts the confirmation message to the user – I am happy with the planning changes, so typing yes.

The Terraform confirmation message

10. ..and if everything has finished successfully, you should be able to see this message in the end

Resources successfully created
Resource group with all resources created in Azure portal

Entire main.tf file content

provider "azurerm" {  
  version = "=2.29.0"
  subscription_id = "834b29c3-9626-408d-88e0-12e92793d1f5"
  features {}
}

# Azure functions using a Consumption service plan on Windows OS (default option)
resource "azurerm_resource_group" "example" {
  name     = "azure-functions-cptest-rg"
  location = "australiacentral"
}

resource "azurerm_storage_account" "example" {
  name                     = "msfunctionsapptestsa"
  resource_group_name      = azurerm_resource_group.example.name
  location                 = azurerm_resource_group.example.location
  account_tier             = "Standard"
  account_replication_type = "LRS"
}

resource "azurerm_app_service_plan" "example" {
  name                = "azure-functions-test-service-plan"
  location            = azurerm_resource_group.example.location
  resource_group_name = azurerm_resource_group.example.name
  kind                = "FunctionApp"

  sku {
    tier = "Dynamic"
    size = "Y1"
  }
}

resource "azurerm_function_app" "example" {
  name                       = "mstest-azure-functions"
  location                   = azurerm_resource_group.example.location
  resource_group_name        = azurerm_resource_group.example.name
  app_service_plan_id        = azurerm_app_service_plan.example.id
  storage_account_name       = azurerm_storage_account.example.name
  storage_account_access_key = azurerm_storage_account.example.primary_access_key
}

Also available on GitHub https://github.com/stenly311/Terraform-AzureFunction-InAzure

Overall Terraform CLI rating

  • Cloud provider portability
  • Fewer lines needed to achieve the same infrastructure configuration need compering to Azure ARM Templates
  • Intuitive and fast to learn
  • OpenSource with a wide collection of “get-started” production like examples

Thanks for staying, subscribe to my blog, and leave me a comment below.

cheers\

How to find the local version of AzureRM

This post is not going to be very long -oops, so let’s get straight into the point. Shall we?

Easy way how to find this is by using a PowerShell:

  1. Open the PowerShell and type
Get-InstalledModule AzureRM
AzureRM version installed on localhost in PowerShell

Nice and easy … and I promise my next post will be longer!

Thanks for staying, subscribe to my blog, and leave me a comment below.

cheers\

How to build and provision Azure Cognitive Search service in 20 minutes

This Azure service has been here for a while now, but lately got a few improvements that make the integration and use of it even easier and more seamless than before.

Just before going any further, if you haven’t read anything about it, I recommend you to start with this article first https://docs.microsoft.com/en-us/azure/search/search-what-is-azure-search as I am not going to dive too much into the details today. This reading is going to be about my personal experience of getting a Cognitive Search service provisioned with a bunch of data (of one source) connected to it.

Personally, I like to look at the problems to solve with my business lens. What that means is focusing on building content (business value) rather than building the search engine (feature). I am not saying that compromising (non-business related) system features that are helping users to enhance their User system Experience is a good thing to do. All I am saying is stop re-inventing the wheel!

Hey Devs, don’t give me this wiggle face saying things like: “c’mon, it’s not that hard to do it by yourself!”. Yes, but actually it is hard from the time complexity point of view … To build a great search engine with features your audience is going to like would take many weeks of man/hours to do so. These features include Auto-completion, geospatial search, filtering, and faceting capabilities for a rich UX, OCR (ideally backed by AI), key phrase extraction, image text found results highlighting, and all of that with the ability to scale this service as needed and add as many multiple (and different) data sources as needed.

Can you see my point, now? Did one of your eyebrows just lift up? :)) Anyway .. let’s jump into it and see how long this is going to take me to build in the Azure portal.

Steps how to build a first Cognitive Search as a Service

1) Go to the Azure portal, search for Cognitive Services and add a new one called “Azure Cognitive Search

Adding Azure Cognitive Search to the Cognitive Service library in the Azure portal

2) As for all services in Azure space, you need to fill up what Subscription and Resource Group this service will belong to. And as the next step, preferred URL, Geographic location of the data center, and pricing Tier. I am choosing the free Tier (which should be enough for this exercise) and the location close to NZ. The next step is to click on Validate, and on Create button afterward.

Filling up the service initials

3) The first step in the wizard is the “Connect to your data” tab. That means that on this page you can connect to multiple data sources. As you can see from the picture below, quite a few options are available to choose from (and most likely going to cover all of the use case scenarios). For this exercise, I am going to take “Samples” and SQL database. You can add as many data sources as you want (with the respect to limitations of the selected service Tier type).

Adding a connection to the data source

4) At the “Add cognitive skills” tab I decided to add a bunch of additional Text Cognitive Skills, even though this step is optional. My reasons are purely investigative and I would like to see how the @search.score field in returning data result sets is going to look like when trying to search my documents by any of these fields from the Enriched data set.

Adding extra source fields for cognitive skills run

5) In the next step “Customize target index” (sometimes referred to as a “pull model“) I am going to leave all pre-populated settings as they are as I am happy with it for now. In this step, you can configure things like the level of data exposure, data field types, filtering, sorting, etc.

Just to give you a better understanding of what the search index is in this context – think about it as in a relational database a search index equates to a table. And also we have documents, which are the items of the index. Think about them as documents that are roughly equivalent to rows in a table.

Also, remember to keep a Key field in Edm.String data type. This is a mandatory prerequisite.

Customizing the target indexes

6) In the “Create an Indexer” tab (the way how to index data in a scheduled manner) I am not allowed to configure how often should be mapping table (index) build. The reason for it is that the Sample SQL database I am using in this exercise does not use any Change tracking policies (for example  SQL Integrated Change Tracking Policy). Why is needed? Well, basically Cognitive search needs to know when the data delete change happened to address that. You can read more about it here.

For now, I am going to submit this form and move on.

The service starts provisioning itself (this should not take long to finish) and after a couple of minutes, I should have everything ready for testing.

Create an indexer tab

Testing the Search Service

Now, let’s have a look at “Search explorer” from the service level main top menu and craft some data queries. My first query was the “Bachelor-Wohnung” word, which nicely got populated into the URL query as the value of &search element by itself…

Data result set from an example query

From now on it is all about knowing how to use a query syntax (and you can really go hard on this). For more search query examples visit this MS documentation https://docs.microsoft.com/en-us/azure/search/search-explorer?WT.mc_id=Portal-Microsoft_Azure_Search

I have to say that building this service did take me about 20 minutes (for someone who has some experience already) from having nothing to an easy-to-configure and scale search engine. Anyone should be able to build the first Cognitive search service by a similar time after reading this post now.

If there are any questions or want to know more about this service, visit this site built by Microsoft at https://docs.microsoft.com/en-us/azure/search/. These people did a really great job in documenting all of it. This material should help you to elevate your skills to a more advanced level.

What is the Azure Cognitive Search Tiers pricing

_FREEBASICSTANDARD S1STANDARD S2STANDARD S3STORAGE OPTIMIZED L1STORAGE OPTIMIZED L2
Storage50 MB2 GB25 GB
(max 300 GB per service)
100 GB
(max 1 TB per service)
200 GB
(max 2 TB per service)
1 TB
(max 12 TB per service)
2 TB
(max 24 TB per service)
Max indexes per service31550200200 or 1000/partition in high density1 mode1010
Scale out limitsN/AUp to 3 units per service
(max 1 partition; max 3 replicas)
Up to 36 units per service
(max 12 partition; max 12 replicas)
Up to 36 units per service
(max 12 partition; max 12 replicas)
Up to 36 units per service
(max 12 partition; max 12 replicas)
up to 12 replicas in high density1 mode
Up to 36 units per service
(max 12 partition; max 12 replicas)
Up to 36 units per service
(max 12 partition; max 12 replicas)
up to 12 replicas in high density1 mode
Document Cracking: Image ExtractionN/A
(only 20 documents supported)
(price per 1,000 images)
0-1M images – $1.512
1M-5M images – $1.210
5M+ images – $0.983
(price per 1,000 images)
0-1M images – $1.512
1M-5M images – $1.210
5M+ images – $0.983
(price per 1,000 images)
0-1M images – $1.512
1M-5M images – $1.210
5M+ images – $0.983
(price per 1,000 images)
0-1M images – $1.512
1M-5M images – $1.210
5M+ images – $0.983
(price per 1,000 images)
0-1M images – $1.512
1M-5M images – $1.210
5M+ images – $0.983
(price per 1,000 images)
0-1M images – $1.512
1M-5M images – $1.210
5M+ images – $0.983
Private Endpoints Related ChargesN/AAdditional charges may apply2Additional charges may apply2Additional charges may apply2Additional charges may apply2Additional charges may apply2Additional charges may apply2
Price per unitFree$0.153/hour$0.509/hour$2.033/hour$4.065/hour$5.805/hourN/A
Azure Cognitive Search Tiers pricing

Overall Azure service rating

  • it is very easy to create your own search SaaS in a couple of minutes
  • the intuitive way how to integrate new data sources into the service
  • easy to leverage cognitive capabilities in features like OCR
  • CONVENIENCE – zero coding is required on the service side, all search service settings can be configured in the Azure portal

Thanks for staying, subscribe to my blog, and leave me a comment below.

cheers\

How much does ACR (Azure Container Registry) cost?

Well, believe it or not, this Azure service has no free subscription. The ‘cheapest’ one is about $0.252/day with a total of 10 GiB of storage and 2 Webhooks. Unfortunately, with no support for Geo-replication.

As pricing can change over the time, this site should give you the most up-to-date details: https://azure.microsoft.com/en-us/pricing/details/container-registry/

_BASICSTANDARDPREMIUM
Price per day$0.252$1.008$2.520
Included storage (GiB)10100500
Premium offers enhanced throughput for docker pulls across multiple, concurrent nodes
Total webhooks210500
Geo-ReplicationNot SupportedNot SupportedSupported
$2.520 per replicated region
Azure Container Registry pricing

Do I like ACR?

Yes and no …

For big projects in size, where the biggest proportion of the solution services is getting provisioned in Azure – Yes, definitely. The level of convenience of having ‘everything’ (source code, tool-set, hosting environment, …) in one place plays a big role here. The assumption is that if Devs/DevOps are happy with the tool-set within the same platform, the overall progress on the project should be faster as there is no need for extra work for system integration and shaping diametrically different skills sets (theory but works in many cases).

And for the projects hungry for disk space and tight to budget – No. There are cheaper alternatives on the market, for example, Docker.com (with one private repository in the Free plan – whoop, whoop!). Pricing starts as low as USD $5/month (with an annual plan) which is insanely CHEAP! So if Azure is not your dime in solution, Docker.com would be my choice to pick.

More details about Docker pricing (and most updated) can be found here: https://www.docker.com/pricing

Docker pricing and subscriptions

Thanks for staying, subscribe to my blog, and leave me a comment below.

cheers\

Committing and Pushing Docker image changes to Azure Container Registry

Docker image

If you made it this far, then you must know something about the Docker (Containerization). That is great because this post is not about what Docker really is but how to work with image revisions in conjunction with the Azure Container Registry (aka repo).

I am assuming you have your own repository in Azure created already and know the basic commands of how to spin up the container (or leave the comments below).

Also that a Docker desktop is installed on your PC and has a docker image ready to be used for this exercise.

User story

You as a developer want to create a starting (based) image out of the running container on your localhost (image type regardless of this exercise) for your co-workers. The image is going to be parked in ACR for easy access. The initial version is going to have the tag ‘v1’.

Steps to follow

1. Download MS Azure Command Prompt, the latest version can be found here, or just use google search


2. Validate that installation has been successful by starting the MS Azure Prompt and run

az --version
If you see this, then you did well!


3. Log in to Azure by using this command below (you should be redirected onto the browser app with portal.azure.com as URL. Now, use your user credentials and wait for a callback redirect back to the terminal (MS ACP)

az acr login --name <your ACR name> 

Example:

az acr login --name webcommerce22


4. Commit the latest changes on the top of the running docker container (docker desktop) with tag v1 (this operation creates a new image). Remember that only these characters are allowed in naming ‘a-z0-9-_.’

docker commit <docker container hash id> <repository URL>[/<new image name>][:<tag name>]

Example:

docker commit 2cbbb6f54f4b webcommerce22.azurecr.io/web-api-pricing:v1
The created new image out of the running container


5. Push the changes to ACR

docker push <repository URL>[/<image name>][:<tag id>]

Example:

docker push webcommerce22.azurecr.io/web-api-pricing:v1
Pushing image to Azure Container Registry
A new container repository is created with a v1 image in it


And here you are. Great way how to keep your changes over the container image revisioned.

For more details about the docker commands, I can recommend following this URL https://docs.docker.com/engine/reference/commandline/docker/

Thanks for staying, subscribe to my blog, and leave me a comment below.

cheers\